The Correct Order for Removing Protective Clothing Before Leaving a Resident’s Isolation Room: Suit, Suits, Isolation Gown, Isolation Suit
In scientific and epidemic prevention and control paintings, the proper removal of shielding garb is a essential step in preventing go-infection and making sure personal safety. this article will difficult at the right series for doing away with protective garb to make sure the protection and hygiene of scientific workforce and people after leaving the isolation room. below are the unique steps for doing away with protective apparel.
The importance of correctly removing protective clothing
The significance of proper wearing and doffing of shielding fits can’t be overstated. In a scientific environment, protecting suits are a crucial barrier for healthcare employees in opposition to viruses, bacteria, and other pathogens. efficiently casting off protective suits can prevent the spread of pathogens thru the surface of the garb after leaving the isolation room, thereby protecting healthcare employees and different sufferers from infection.
-
save you cross-infection: In a clinical placing, defensive fits are an essential barrier for healthcare employees to protect towards viruses, micro organism, and other pathogens. right removal of protecting suits can prevent the unfold of pathogens through fallacious handling after leaving the isolation room, shielding healthcare people and other patients from contamination.
-
make sure non-public safety: at some stage in the process of wearing and getting rid of shielding fits, healthcare employees may come into contact with viruses or micro organism. therefore, following the proper elimination steps helps lessen the chance of infection and guarantees the safety of healthcare people.
-
enhance paintings efficiency: the appropriate removal sequence can lessen the bulky operations of healthcare people when handling defensive fits, saving time, and enhancing performance.
four. reduce medical waste: improper dealing with at some stage in removal may result in harm to the protective fit, increasing the era of scientific waste. Adhering to the correct removal steps can maximize the discount of scientific waste and alleviate the environmental burden.
-
hold medical order: proper elimination of shielding suits is a part of the usual medical operation. Adhering to the norms helps preserve clinical order and decorate the general image of scientific establishments.
-
make sure accuracy of statistics: for the duration of a scourge of a pandemic, the usual of healthcare workers’ elimination of protecting fits directly influences the accuracy of case facts. correct removal steps contribute to ensuring the authenticity and reliability of case records.
-
expand the provider lifestyles of protecting fits: As a unmarried-use product, defensive fits can be prolonged in service lifestyles through proper removal, decreasing harm to the fits.
-
enhance the protecting effect of protecting suits: the protective impact of defensive fits is intently related to their integrity. accurate elimination steps make certain that the protecting in shape stays intact at some point of put on, as a consequence completely exerting its defensive feature.
The importance of proper elimination of shielding fits is of utmost importance. Healthcare workers should master the elimination steps and strictly adhere to operational specifications to ensure the protection of themselves and others, contributing to the fight against the pandemic.
The steps for removing protective clothing in order:
-
while disposing of gloves, it should be prevented to touch the inside of the gloves with the again of the hand to save you capacity pass-infection. Clamp one hand around the wrist of the opposite hand, and flip the gloves at the wrist to show both palms.
-
whilst putting off mask and goggles, it’s far crucial to avoid touching the face to prevent virus transmission. First, unfasten the ear bands or ties of the masks, gently carry it faraway from the nostril bridge, then quickly grab the perimeters of the mask with the opposite hand, ensuring the inside faces out to avoid contact with the face.
-
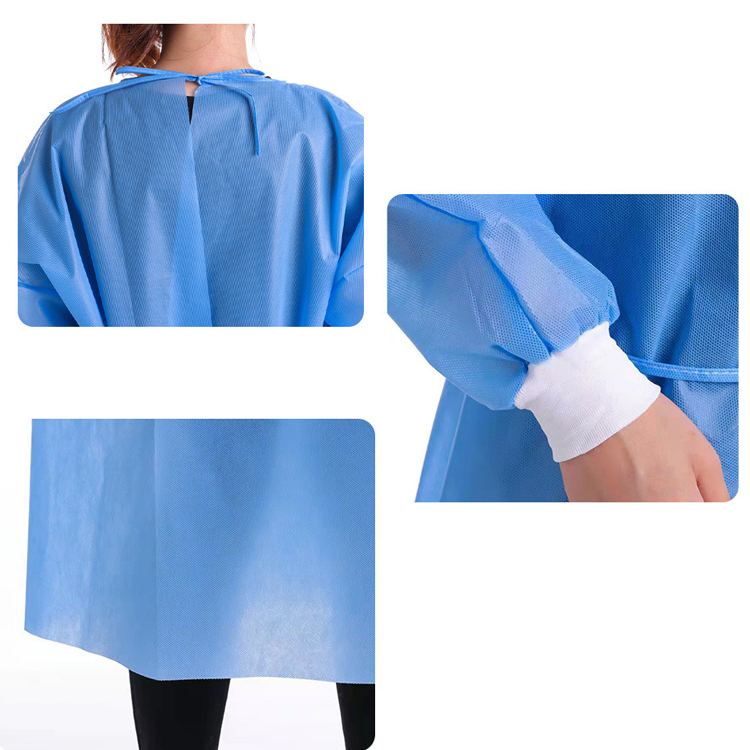
Unzip or unfasten the closures of the isolation suit, being cautious now not to touch the interior of the healthy. preserve one hand at the collar and the opposite at the waist of the match, pulling it down from above the pinnacle to make sure the body is absolutely out of the clothing.
-
when doing away with shoe covers or boots, first unfasten the securing straps, then pull the shoe covers or boots off from the ankle. If it’s boots, cautiously cast off them from the ft to keep away from contamination within the boots.
-
throughout the manner of casting off the protecting equipment, hold your palms clean and keep away from using fingers which have been contaminated to touch the face or different items.
-
After casting off the protective equipment, without delay disinfect your palms. Use disinfectant liquid or disinfectant wipes, wiping from the fingertips to the wrist so that you can ensure thorough disinfection of the fingers.
-
look into the eliminated protective equipment to verify there aren’t any tears. If there are tears, re-disinfect and re-don the protecting equipment.
eight. well cast off the used protecting gadgets. location the removed protective fits, gloves, mask, and many others. into a double-layer yellow waste bag, seal it, and hand it over to experts for harmless disposal.
by way of following those steps, the threat of move-contamination can be efficiently reduced, ensuring the safety of clinical employees. In actual operation, medical group of workers need to strictly adhere to the sequence of casting off protecting equipment, making sure that every step is performed well, contributing their efforts to the fight against the pandemic.
Step 1: Remove gloves
The system of doing away with shielding gloves is a crucial first step inside the elimination of personal protecting device, as it is vital to save you move-infection. here are the unique steps for putting off gloves:
- make sure that both fingers have been disinfected to reduce the hazard of infection.
- Use one hand to grip the edge of the glove, avoiding direct touch with the inner of the glove.
- gently turn the glove from the wrist, in order that the interior faces outward.four. keep the inside of the glove dealing with outward, and use the other hand to assist in removing the glove from the opposite hand.five. keep away from allowing the inside of the glove to come into touch with the skin or clothing all through the removal technique.
- After eliminating the glove, turn it internal out to make certain the tainted aspect is outward, preventing the unfold of infection.
- area the flipped glove into the distinct medical waste bag, making sure the bag is tightly sealed.eight. immediately after eliminating the gloves, very well wash arms with soap and strolling water, or use an alcohol-based totally hand sanitizer for disinfection.
- After washing or disinfecting, make sure the fingers are dry to prevent recontamination.
- during the technique of doing away with the gloves, stay centered to keep away from contamination due to fallacious handling.
by way of following these steps, move-contamination may be effectively averted at some stage in the elimination of private protecting device, caused by wrong dealing with of gloves. the proper sequence of operations now not handiest protects the protection of the operator however additionally ensures the health of patients and others.

Step 2: Remove the mask and goggles
whilst casting off a masks, observe those steps to make sure protection:
-
make certain that the mask is fully suited to the face with no gaps. this is to prevent the virus from spreading via any viable small openings.
-
lightly draw close the ear loops or ties of the masks with one hand, keeping off direct contact with the interior of the mask to lessen the hazard of go-contamination.
three. Slowly take away the mask with out pulling too tough to save you the mask from falling off and causing droplet transmission.
four. even as getting rid of the masks, use the other hand to slide the goggles or face guard down from the face, once more averting contact with the surface.
five. as soon as the mask and goggles are removed, straight away vicinity them into the specified waste container to make sure they do no longer come into contact with different items.
-
right away after getting rid of the masks, thoroughly clean your palms with soap and going for walks water or an alcohol-based hand sanitizer, from the fingertips to the recommendations, the palm of both fingers, and the wrists.
-
If the hand sanitizer includes alcohol, make certain your fingers are completely dry before proceeding.
eight. check for any cuts or wounds for your hands. If there are any, disinfect them immediately and use disposable gloves or different defensive measures.
-
once your fingers are clean and dry, proceed with the next step, that is disposing of the top a part of the isolation suit.
-
If the mask or goggles by chance fall off all through the removal procedure, straight away use the inner of your elbow to cover your mouth and nose, and quick find a new mask and goggles to re-apply.
eleven. all through the method, attempt to minimize body movements to avoid secondary contamination.
- once the masks and goggles are appropriately removed and placed within the distinct box, proceed at once to the subsequent step, that’s eliminating the upper a part of the isolation healthy.
with the aid of following those steps, the risk of virus transmission at some stage in the elimination process can be effectively reduced, making sure the safety of each workforce and sufferers.
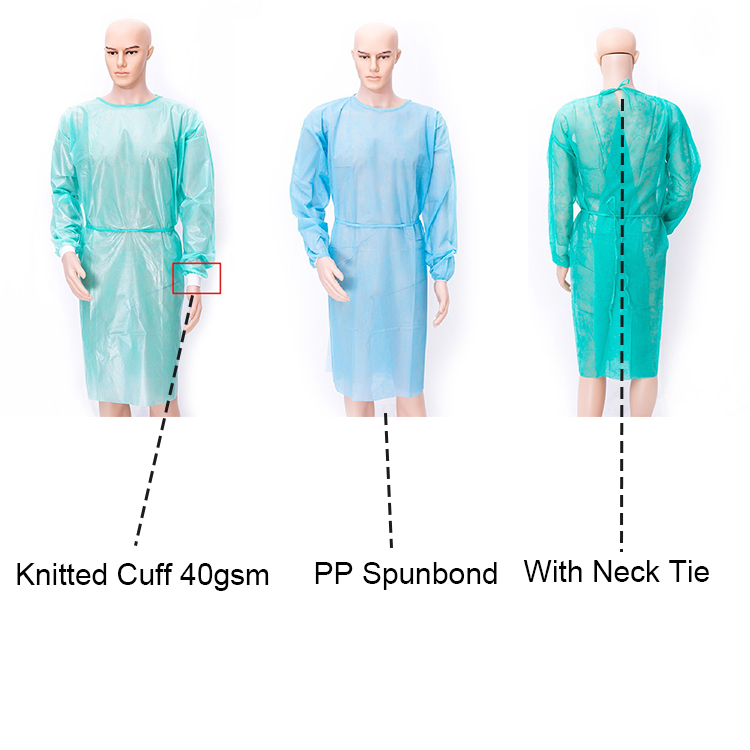
Step 3: Unzip and remove the isolation suit
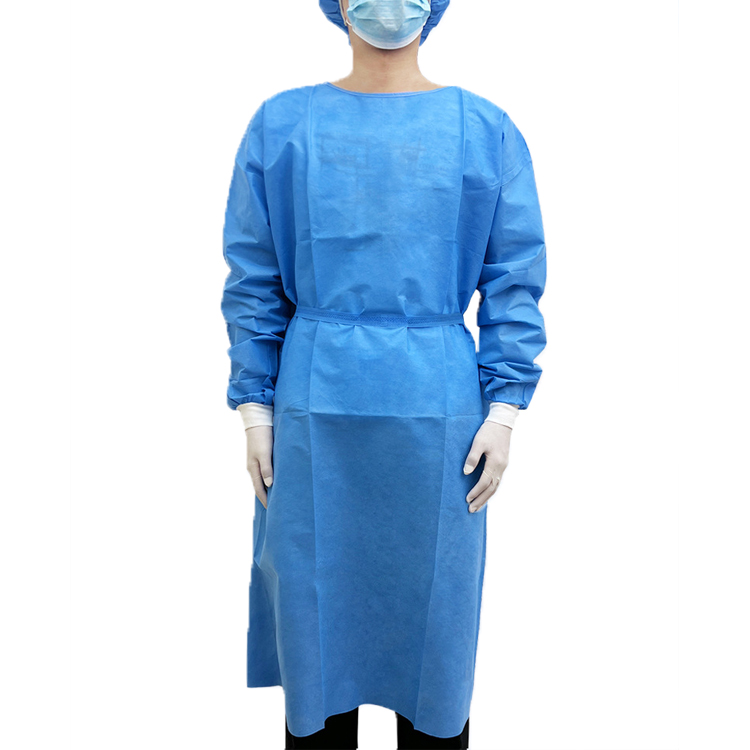
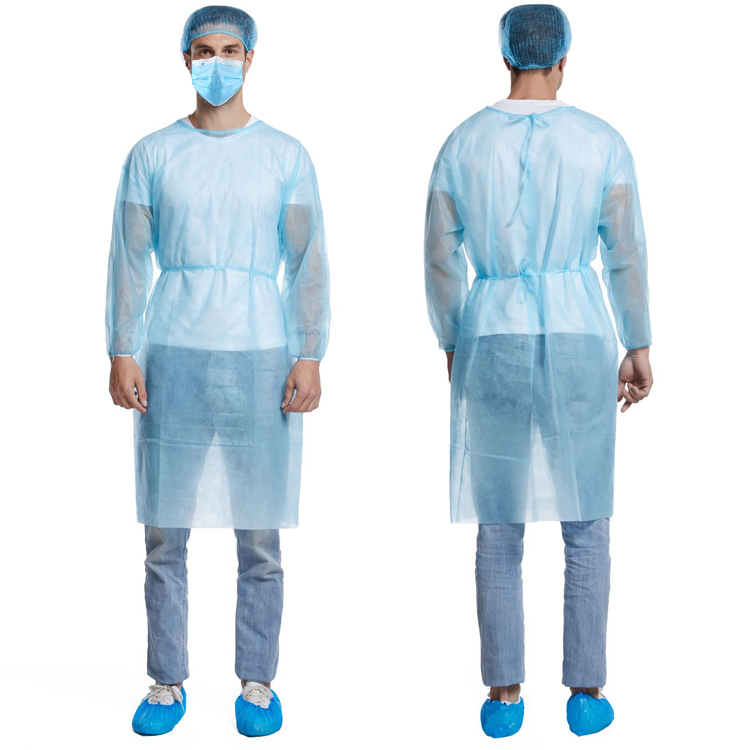
The method of doing away with personal protective equipment (PPE) entails numerous important steps, with the 0.33 step being the elimination of the isolation robe. This step is vital due to the fact the isolation robe serves because the number one barrier against the transmission of pathogens. right here are the unique steps for getting rid of the isolation gown:
-
make certain that your palms had been thoroughly disinfected to avoid move-contamination throughout the elimination process.
-
observe the location of the zipper or buttons on the isolation gown to ensure they’re operable.
three. Use fingers which have now not been contaminated to softly carry the collar of the isolation gown, allowing it to slightly move faraway from your head.
-
If the isolation robe has a hood, start with the aid of disposing of it from one side, carefully heading off contact with your face.
-
subsequent, cautiously pull the isolation gown down from the shoulders, permitting it to slip right down to the waist.
-
at some point of the removal, maintain the interior of the gown going through yourself to prevent external infection from contacting the interior of the garb.
-
as soon as the robe has slipped down to the waist, enlarge your fingers into the sleeve openings from both aspects and hold close the collar of the robe.
eight. lightly pull the robe up out of your body, ensuring that no part of the robe comes into contact with any unprotected frame components.
nine. As you do away with the gown, make sure that the outlet of the gown is usually dealing with in the direction of you to prevent inner contamination.
-
After doing away with the robe, test for any exposed garb or pores and skin; if any are located, disinfect them at once.
-
Fold the removed gown well, making sure that the hole is going through inward to save you infection.
-
area the folded gown into a delegated clinical waste bag and seal it well.
-
After handling the gown, disinfect your hands very well once more.
-
If the robe has any breaches or suspected infection, it must be at once processed in step with hooked up protocols and a brand new robe must be worn.
-
throughout the elimination manner, remain calm and focused to avoid secondary infection due to incorrect handling.
by following those steps, you can effectively cast off the isolation gown at the same time as ensuring the protection of yourself and others. the perfect series of removal is vital for stopping the transmission of pathogens, and it need to be strictly adhered to all through the operation.
Step 4: Remove shoe covers or boots
all through the procedure of removing non-public shielding device (PPE), the fourth step is to get rid of the shoe covers or boots. This step is equally vital due to the fact the shoe covers or boots may be contaminated with pathogens or pollution. right elimination strategies can effectively reduce the danger of go-infection.
-
locate the removal starting or zipper at the shoe covers or boots. normally, shoe covers are designed with an opening or zipper to facilitate removal at the same time as wearing PPE.
-
Use hand protection to ensure that your fingers are absolutely covered through gloves. avoid touching the outer facet of the shoe covers or boots with naked arms.
three. With the internal aspect of the gloves going through out, use the opposite hand to softly grasp the elimination starting or zipper on the top or side of the shoe covers or boots.
-
Slowly pull open the elimination beginning or zipper, being cautious now not to reveal the internal aspect of the shoe covers or boots.
-
With the hole in part open, cautiously pull your ft out of the shoe covers or boots. flow lightly to avoid unfavorable the shoe covers or boots throughout elimination.
-
as soon as your toes are out, keep to tug the opening wider until the shoe covers or boots are completely removed. make sure that the outer aspect of the shoe covers or boots stays dealing with out at some point of the removal system.
-
vicinity the removed shoe covers or boots into a delegated clinical waste bag. If there’s a zipper, relaxed it first to make sure the bag is sealed.
-
if your gloves tear at some point of the elimination procedure, replace them right now to keep away from direct pores and skin contact.
nine. After removal, very well disinfect your palms with disinfectant, particularly the areas of the skin that can had been exposed throughout the elimination procedure.
- Reput the disinfected hands with a new pair of gloves to make sure cleanliness during the subsequent removal steps.
eleven. during the elimination method, hold a safe distance from others and avoid contact, in particular after crowning glory. leave the isolation vicinity right now.
- subsequently, take a look at that the eliminated shoe covers or boots are completely sealed within the waste bag to prevent secondary contamination.
through following these steps, you may successfully and accurately remove the shoe covers or boots, lessen the hazard of infection, and make certain the protection of both your self and the encompassing surroundings.
Step 5: Thoroughly disinfect your hands.
After disposing of the isolation fit, it’s miles crucial to very well disinfect your palms. here are the certain steps for the disinfection system:
-
take a look at the disinfectant: make sure that the disinfectant used meets the regulatory necessities, has enough disinfecting strength, and is within its expiration date.
-
Retrieve the disinfectant: Open the packaging of the disinfectant, take the correct amount of the disinfectant solution, generally sufficient to cowl both hands.
-
close the packaging: After the disinfectant has been taken out, straight away near the packaging to keep away from waste and contamination.
-
observe the disinfectant: follow the disinfectant calmly to both palms, making sure that each finger, finger creases, wrist, and palm are blanketed.
five. Press and rub: Use the palm of one hand to press and rub from the finger creases of the opposite hand, running through each finger, palm, and wrist. Rub for at the least 30 seconds to make certain the disinfectant is completely absorbed.
-
clean the finger creases: Pay special interest to the finger creases and nail edges, and easy them with the disinfectant to avoid bacterial residue.
-
Wash palms: thoroughly rinse off the disinfectant, using either water or a hand wash containing a appropriate quantity of disinfectant.
eight. Dry arms: Dry your arms with paper towels or a clean towel, fending off the usage of public towels to save you go-infection.
-
Recheck: After disinfection, recheck your palms to make certain thorough disinfection and no residue.
-
important Notes:
- avoid touching your face, eyes, and mouth together with your palms at some stage in the disinfection manner to save you the disinfectant from coming into your body.
- The disinfectant may additionally irritate the pores and skin; if discomfort is felt, rinse with water right away.
- If there are any wounds, bandage them directly after disinfection to save you contamination.
- keep appropriate personal hygiene habits, wash palms frequently, and save you the spread of sicknesses.
by using following those steps, you could make certain that the disinfection of your fingers after casting off shielding gear is successfully finished, reducing the danger of pass-infection.
Step 6: Inspect the integrity of the protective suit
After removing the protective suit, checking its integrity is a crucial step to ensure the effectiveness of the protection. Here is a detailed description of the process:
-
Observe the Surface of the Isolation SuitCarefully inspect the surface of the isolation suit for any signs of tears, rips, or leaks. Any visible damage may allow potential pathogens to penetrate the protective layer, increasing the risk of infection.
-
Check Seams and EdgesInspect the seams and edges of the suit, particularly the areas around the sleeves, collar, and hem, which are prone to friction and wear. Ensure that there are no gaps in these areas to prevent pathogens from entering through these vulnerable points.
-
Inspect Gloves and MasksAlthough gloves and masks have been removed, check for any signs of damage during their use. If any damage is found, new protective equipment should be immediately replaced.
-
Check Goggles or Face ShieldsFor goggles or face shields, check for fogging, water stains, or dirt, which may impair vision and also indicate wear or damage to the protective equipment.
-
Check for Skin ExposureAfter removing the protective suit, check for any areas of the skin that have come into direct contact with the outside. If any are found, they should be disinfected immediately and these areas should be properly protected in subsequent protective measures.
-
Assess the Duration of Suit WearAssess the duration of the suit’s wear. If the suit has been worn for an extended period, it may have been worn out, thereby reducing the protective effect. If significant wear is observed, a new suit should be immediately replaced.
-
Record Inspection ResultsRecord the inspection results for future protective measures and risk assessment. The record should include the condition of the suit’s damage, the duration of wear, and any other factors that may affect the protective effect.
-
Perform Additional Disinfection if NecessaryIf any damage or suspected contamination is found during the inspection, these areas should be immediately disinfected to ensure that all potential risks are controlled.
-
Confirm the Suit is Intact and LeaveConfirm that the suit is intact before leaving the isolation area. Before departure, check again that hands are clean to avoid cross-contamination during the exit process.
-
Dispose of or Clean the Protective SuitAccording to the type of protective suit and usage guidelines, decide whether to discard or clean and disinfect the suit. For disposable protective suits, they should be disposed of according to medical waste disposal regulations; for reusable protective suits, they should be cleaned and disinfected according to the cleaning and disinfection procedures.
By following these steps, the integrity of the protective suit after removal can be ensured, thereby minimizing the risk of infection and safeguarding the health and safety of individuals and others.
Step 7: Properly Dispose of Waste Personal Protective Equipment
After the elimination of private protective equipment (PPE), the right disposal of discarded protecting gear is crucial. the subsequent is an in depth description of this process:
-
collection of discarded PPE: gather used protecting fits, gloves, masks, goggles, and different discarded items in a centralized way to avoid direct touch and save you ability go-infection.
-
Use of specific packing containers: vicinity the discarded PPE into distinct scientific waste boxes, which can be normally genuinely marked for identification and class.
three. comply with disinfection methods: earlier than setting the objects into the container, use disinfectant to wipe the surfaces of the gadgets to reduce the ability unfold of pathogens.
four. Seal the bins: make sure that the packing containers are completely sealed to save you any spillage or environmental infection during transportation.
-
Label the containers: attach appropriate labels to the boxes indicating the sort of waste and the date, for smooth monitoring and control.
-
Standardized transportation: delivery the sealed waste packing containers in accordance with the guidelines of scientific establishments or nearby health departments to certain clinical waste disposal web sites.
-
Adhere to disposal tactics: at the disposal web site, workforce will sort, bundle, and surrender the waste to professional medical waste disposal companies in step with the prescribed methods.
eight. record disposal method: throughout the disposal manner, certain records need to be saved of the sort, amount, and disposal time of the waste for next supervision and auditing.
nine. private safety: when handling discarded PPE, body of workers ought to put on appropriate non-public defensive system inclusive of gloves, protecting fits, and goggles to save you direct contact with contaminants.
-
safe disposal: The disposal of discarded PPE have to adhere to protection and environmental protection standards to make sure no secondary pollution to the environment or human health.
-
normal schooling: clinical establishments need to conduct normal schooling for workforce at the disposal of discarded PPE to ensure that everybody is acquainted with an appropriate strategies and precautions.
-
continuous supervision: clinical institutions should set up a special supervision mechanism to regularly look at the disposal manner of discarded PPE to ensure that every one operations comply with guidelines.
with the aid of following these steps, the dangers associated with discarded PPE may be efficiently mitigated, defensive the environment and public fitness safety. right disposal of discarded PPE is a part of the duty of clinical team of workers and is an vital factor of ensuring the safety of sufferers and themselves.